Microsoft Excel for Lawyers on PLI 1/10/23

On January 10, 2023 at 1 pm EST I’ll be presenting a One-Hour Briefing on the PLI platform called Microsoft Excel for Lawyers. This online program includes CLE credit in many jurisdictions, and may be available free of charge if your institution has a PLI subscription.

If you’ve already registered, please download the workshop file here

To learn more about the program, including how to register, visit the PLI program page here.

Hope to see you there!

Posted in CLE, eDiscovery, Everybody, law firm training, Native File Review | Tagged , , | Leave a comment

Create a Signed pdf/a Without Scanning the Entire Document

Today, a quick non-Excel tip that may help preserve your sanity when it comes time to e-file a large brief.  Here in New York, and in other jurisdictions as well, briefs must be filed in pdf/a format. Among other things, this ensures that the document will be searchable, and that it cannot be edited.  Many folks will print a long brief from Word, sign the signature page, and then scan the entire document into pdf.  This can result in a very large file size-sometimes too large to e-file.  Here is a workaround that only takes a couple minutes that results in a much smaller file.

1, Print and sign only the signature page

2. Scan the signed signature page.

3. OCR the signature page, if there is content on it (under Tools ⇒RecognizeText)

4. Meanwhile, print the entire brief (sans signature page) to Adobe PDF, and save locally.

5. Combine the pdf version of the full brief and the pdf signature page into one pdf as follows:

Use the feature “Combine Files into PDF”; then drag and drop the two new files (e.g., directly from the downloads folder) into the dialog box:

EE-pdfchoices   sort11   pdf-adobe_combine_dialog2

6. If necessary, delete the redundant, unsigned signature page.

7. Now, convert the combined document to pdf/a format by printing to pdf and adjusting the settings as follows:

Choose Adobe PDF as your printer, but click on Properties before you hit OK:

pdfa-properties

In the tab “Adobe PDF Settings” click on Default Settings and select pdf/a (there may be several choices):

pdfa-choose pdfa

Hit OK to launch the “print” and Acrobat will prompt you for a filename and location.

The resulting pdf will be in pdf/a format, suitable for e-filing. Despite the long-winded explanation, the whole process only takes a few minutes – promise!


Posted in CLE, eDiscovery, Everybody, Lit Support, Practice Management | 2 Comments

Amazing 3D Map Charts in Excel 2016

I recently joined a presentation at a meeting of the Professional Legal Trainers Group in New York City to discuss some of the new chart types in Excel 2016.  The crowd favorite was the new built-in 3D Maps.  While not technically a chart type, this feature enables even a casual Excel user to generate stunning graphics.  Attorneys should explore this tool to generate trial graphics, client pitches, motion exhibits, and other communications.  In this post I’ll demonstrate the use of 3D Maps using a set of data listing public donations to the Obama-Biden transition project downloaded from the Socrata website.

As seen below, the dataset includes information for about 56,000 discrete donations, including city, state, and ZIP.  We’ll use the 3D Maps tool to plot these geographically.

3DM-data

There are several requirements for using 3D Maps.

  1. Your data must be in the form of a table – one record for each row, a descriptive Header row, and no blank rows or columns.
  2. There must be some kind of recognizable location data, be it ZIP code, city, latitude/longitude coordinates, etc.
  3. You must have an internet connection – Excel will use Bing to generate the map and plot the data
  4. You must be running Excel 2016

Click anywhere in the data table and launch 3D Maps from the Insert ribbon, as shown below.  There is no need to run a pivot table or organize the data:

3DM-menu

The first time you do this, Excel will ask for permission to install an add-in.  Click yes.  The process of installing the add-in may lock up your computer for a couple minutes.

Excel then syncs up with Bing, which scans your data for location information and generates a default “tour” which flags all the locations that it found in your data based on a field that it chooses.  You can spin and tilt this globe, and zoom in on any location you choose.  It’s even more fun than it sounds.

3DM-defaultglobe

Bing used the City information for this default plot, and not too accurately–its own estimate is that it only found 84% of the locations (most of the rest were misspelled–click on the “84%” for details).  Here I will delete the default location fields and start over with the “Add Fields” tool.

3DM-layereditingwindow

I choose ZIP from the available fields to prompt Bing to organize and plot the data by ZIP code.  On my machine it takes a couple minutes, but it is fun to watch the map filling up with blue flags.

3DM-slowzipfill

Once the flags are all filled in, expand the Add Field choices under the Height option.  Here you can plot any available metrics against the ZIP code.  I am choosing Amount to see the donations plotted by ZIP.

3DM-firstmap

Now we’re getting somewhere.  Note that the default display is the Sum of the donations for each ZIP code.  From the dropdown you could change this to Count (to show the number of donations), or the Maximum, Average, etc. — not unlike a Pivot Table.

3DM-heightchoices

To get a really impressive display, manipulate the thickness of the columns and the overall scale of the column height under the Layer Options – these dramatically change the look of the map.  You can also adjust the color and shape of the columns.

3DM-layeroptions

To provide the reader some context, you may also want to insert Map Labels from the Home ribbon.  Here is the display I settled on.

3DM-finalcolumnmap

You can click on any data point to learn the ZIP code and dollar amount it represents–apparently, Obama is big in St. Pete.

3DM-Floridadetail

You can also generate beautiful 2D maps by clicking Flat Map from the Home ribbon.  In this example I’ve tilted the Flat Map all the way back, mapped by State rather than Zip, and applied a new color scheme.

3DM-2Dpurplemap

I would be remiss if I neglected to point out an issue with this dataset.  Once you plot the data by ZIP Code, you can spin the globe and you’ll see some data popping up in Europe.  According to the plot, Bulgaria was an especially fecund source of donations:  the humble town of Obichnik, Bulgaria ostensibly donated $26,225 to the transition project.  What the heck?!

3DM-BulgariaProblem

It turns out that Excel dropped the leading zero for certain ZIP Codes, and Bing did not correctly associate the resulting 4-digit Zips with their American counterparts, instead casting about for a world city with that 4-digit Zip.  Thus, for example, the ZIP code for Greenwich, CT (06831) was shortened to 6831, which Bing associated with Obichnik, Bulgaria.  In an earlier post, I discussed a trick for adding the correct number of padding zeroes to incorrectly formatted Bates numbers by using the TEXT function.  The same technique would work here to restore the leading zeroes in these ZIP codes.

We’ve just scratched the surface of what is possible with 3D Maps. Think about the potential to enhance your trial graphics, motion exhibits, expert reports, client pitches, and other communications with this great new tool.

Thank you for reading.  If you would like your team to learn to use Excel more effectively, please get in touch with Ben Kusmin of Excel Esquire.

Posted in CLE, Everybody, Practice Management, trial graphics | Leave a comment

September Event with PLTG – New Charts in Excel 2016

Professional Legal Trainers Group (PLTG) is a group of (mostly) New York law firm software trainers, which meets regularly to exchange ideas about supporting the legal training community.  They’ve invited me to their September 14th event called Effective Data Visualization: Excel 2016 Charts. I’ll be joining Jean Scott from the Legal Aid Society and Carol Gerber of Cooley (my alma mater!) to discuss all the exciting new charts available in Excel 2016, and how attorneys can use them. Spoiler alert: my favorite is the Sunburst, pictured below (courtesy of Microsoft):

Breaking-down-hierarchical-data-with-Treemap-and-Sunburst-charts-6

DLA Piper’s New York office will host this event, which runs from 9:00 to 11:30 AM on September 14th.  Please let your organization’s trainers and IT folks know about this event–they can follow this link to learn more and register.

Have you found an effective way to use Excel’s new chart types in your legal practice? Please share in the comments, and thanks for reading.

Posted in eDiscovery, Everybody, law firm training, Lit Support, Practice Management, trial graphics | Leave a comment

“Very Hidden” Worksheets in Excel – Another eDiscovery Challenge

Most experienced Excel users know how to find and unhide hidden worksheets in an Excel file.  Typically, you can right-click on any tab name and you will see the Unhide option if there are any hidden worksheets. (More about that below)  Any attorney reviewing Excel files–whether for an outgoing production, or as incoming evidence–must know how to identify and expose the hidden worksheets.

But there is a deeper, more sinister level of hiding that will not even trigger the Unhide option.  This level is called, in Microsoft’s parlance, “Very Hidden” – keep reading to learn how to identify and unhide these worksheets.

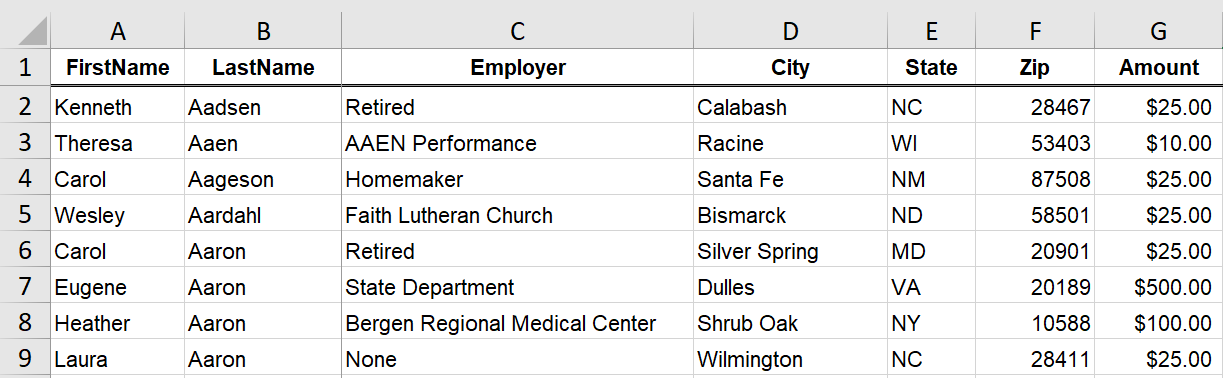
In this example file (download it by clicking here) there are 4 worksheets: two unhidden worksheets, one that is hidden normally, and one that is Very Hidden.  In the default view you can see only the two unhidden worksheets: Perfectly Legal Deals and More Upstanding Deals

VH-twovisibletabs

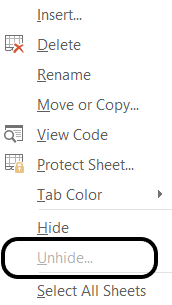
When you right-click on any of the tabs, you see the option to Unhide; when you click on it, there is only one worksheet offered for unhiding.  It is called Sketchy Deals.

VH - unhide options

Once you unhide it, Excel will not offer you any more worksheets to unhide; the Unhide option is now grayed out.  It seems as though you are done.

VH-nounhideoption

You have to dig deeper to find and expose the Very Hidden worksheet.  Perform the following steps:  Right-click on any visible tab, but rather than choosing Unhide (it should be grayed out at this point), choose the option View Code.  This will launch a new window called VB Editor.  Don’t panic! You won’t have to write any macros.

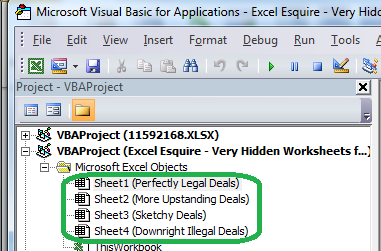
A Project window and a Properties window will pop up.  In the Project window, you will see the Excel file listed as a “VBAProject” and each of its worksheets listed as Microsoft Excel Objects.

VH - all tab list in VBA

If you have multiple files open, all of the files and their worksheets will be visible in the Projects window, so you might want to close any other Excel files while you do this, or hit the – sign to collapse each workbook in the Project window.

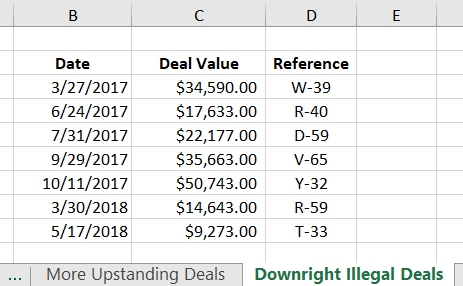
Now, you’ll see all of the worksheets, by name, regardless of Hide level.  Note the lurking worksheet called Downright Illegal Deals.  Click on this worksheet and a list of Properties will pop up below.  The visibility setting is the last property listed.   For a Very Hidden worksheet such as this one the setting is “2 – xlSheetVeryHidden”

VH-properties

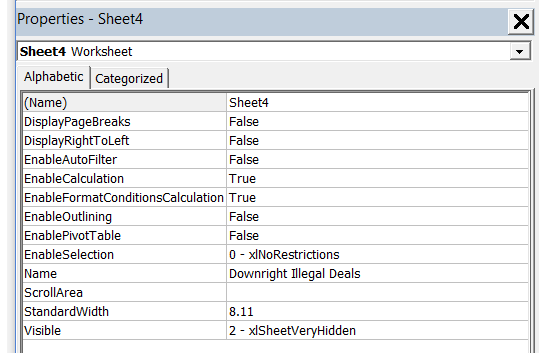
An unhidden worksheet will have a visibility value of -1 (“xl Sheet Visible”); a normally hidden worksheet will have a visibility value of 0 (“SheetHidden”).  The higher the number, the more hidden the worksheet is.

Now for the fix:  There is a drop-down here where you can change the visibility setting, so you can change the sheet from Very Hidden to normally hidden, or unhidden (or vice-versa).  That simple!

VH-change setting

Here, use the dropdown to change the visibility for Downright Illegal Deals from 2 to -1, making it unhidden.

When you are done adjusting the visibility settings, close out of the VBA editor by hitting the x for the Microsoft Visual Basic window.  The Excel window will stay open.

The material in the formerly Very Hidden worksheet can now be viewed, analyzed, printed, and–my favorite part–entered into evidence.  And beyond the evidentiary value of the exposed material, the fact that your adversary went to all the trouble of burying it in a Very Hidden worksheet should itself be fodder for a rough cross-examination at deposition or trial.

VH-downrightillegal

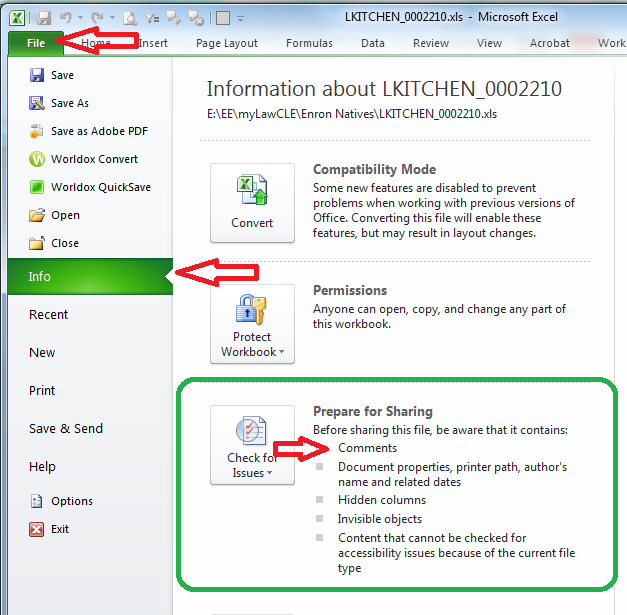
The possibility that your discovery may include Excel files with Very Hidden worksheets may be unsettling – do you have to open the Visual Basic editor for every Excel file to confirm there aren’t any Very Hidden worksheets lurking?  Fortunately, no.  The Document Inspector tool will flag the presence of any hidden worksheets, whether normally hidden or Very Hidden.   Click on the File Ribbon and you will see critical issues listed under Prepare for Sharing ⇒ Inspect Workbook.  Here it will indicate the presence of any hidden worksheets, whether they are normally hidden or Very Hidden.

VH-documentinspector

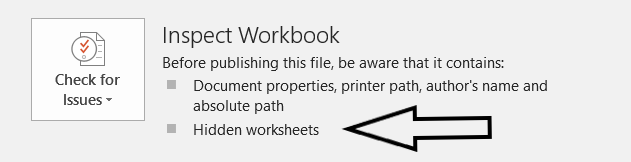
Remember you can also run Check for Issues, and the report will tell you how many hidden worksheets there are.  If you have already unhidden the normally hidden worksheets, but Check for Issues is telling you that there are still some hidden, this is your cue to follow the steps described above to find and unhide the Very Hidden worksheets.

Think about how your eDiscovery software handles files with Very Hidden worksheets.  Can it flag those files as containing hidden content?  Will that content make it into the OCR text?  These are the questions that keep Excel Esquire up at night . . . . .

Thanks to the wmfExcel blog for bringing this issue to my attention.  Read that post here.

I hope you enjoyed this post.  If you would like to learn how to host an Excel workshop at your bar association, law firm, company, or public interest organization, please get in touch with Ben Kusmin of Excel Esquire.

Posted in CLE, eDiscovery, Native File Review, Practice Management | Tagged , | 1 Comment

Upcoming CLE Event for Chicago Bar Association – Advanced Excel for Litigators

The CBA is hosting an exciting new Excel Esquire program called Advanced Excel for Litigators at the historic Chicago Bar Association Building from 12-3 pm on April 20th.  This will be a small, interactive program with plenty of opportunity for feedback.  Participants are encouraged to follow along on their own (or loaner) laptop.

The agenda is chock full of useful skills for litigators and eDiscovery practitioners.  This is a brief overview of the program:

  • Mastering the Filter Tool to Analyze and Edit Data
  • Conditional Formulas, Missing Information, and Complex Sorting
  • Mastering VLOOKUP
  • Special Tools to Reconcile Lists
  • Competent Review of Native Excel Files

Follow this link for more information and registration instructions.  Advance registration is only $55 for CBA members, CLE Advantage members, students, and government employees, and only $85 for everyone else.  Hurry – enrollment is limited to 18!

CBA_Building

To learn about organizing an Excel workshop for your bar association, law firm, corporate legal department, or public interest organization, please get in touch with Ben Kusmin of Excel Esquire.  Thanks for reading!  Feel free to comment, link, or share.

Posted in CLE, eDiscovery, Lit Support, Native File Review, Practice Management | Tagged , , , , | Leave a comment

Pseudo-Scientific Notation, or The Mysterious Case of the Middle E

Typing a part number like 32E50 into an Excel spreadsheet can give you fits.  Excel thinks you are using shorthand for scientific notation, and converts this string into the number 3.20E+51 (or 32 with 50 zeroes) – Ugh!  The way to overcome this feature is to enter the string with a leading single quotation mark, like so: ’32E50

You would do the same thing if you wanted to type a formula, or anything else that begins with an equals sign, without Excel trying to convert it to a formula.

no_math

Thanks for reading – hope it helps!

Posted in Everybody, formulas, Lit Support | Tagged , , , , , | 1 Comment

Finding and Reviewing Comment Boxes in Excel Files

Following the Wells Fargo inadvertent disclosure episode, I wrote a blog post describing several ways to find hidden content in Excel files.  In this post I discuss another feature of Excel that all lawyers, but especially legal document reviewers, should know about: the comment box.

Excel allows you to attach comment boxes to particular cells (just click Shift + F2), and also provides several visibility options.  Depending on the options set by the original user, the comments may be fairly easy to identify and read, or quite challenging.  When reviewing Excel files in discovery, it is important to find and review all the comments – they might contain information important to the case, or reflect privileged information.  Here’s an example of a spreadsheet with comments from the Enron corpus (download the file if you like):

redflags2

In this (default) view, each cell with a comment attached has a tiny red flag in the corner.  When you hover the mouse over such a cell, the comment box pops up.

redflags3

You can change the appearance of comments by going to the Review ribbon and clicking on Show All Comments, but that is no guarantee that some of the comment boxes won’t escape your attention. You would have to visually scan the entire used area of each worksheet to find them.

What about Relativity, you ask?  Unfortunately, it is almost impossible to review comment boxes thoroughly in Relativity. Here is a view of the same Enron file shown above (in Excel), as viewed in the Viewer mode in Relativity:

commentsRelview1

Notice that the red flags used in Excel to indicate a comment are not visible in Relativity.  Hovering over the cells does not bring them up, either.

The underlying comments do make it into the OCR text, albeit not very helpfully.  For some reason the text of the comments is extracted and dumped at the end of the OCR text for the affected tab.  In the view below you can see that the comment “Stephanie K McGinnis: When EPC contract is officially turned on” can be found by searching the extracted text.  But this comment text is sandwiched between the last OCR text on this tab, and the OCR text at the beginning of the next tab.  There is no telling which cell this comment was attached to.

commentsRelview2

Finding all of the comment boxes in an Excel file and reviewing them in context requires reviewing the native file in Excel.  The good news is, there’s a straightforward technique to find and review every comment.  Launch the Find dialog box (e.g., with Ctrl+F), and follow these steps:

  1. Click the Options button to open the additional tools
  2. Under ‘Find What’ type a single asterisk (*) – this is Excel’s wild card
  3. Under ‘Within’ select “Workbook”
  4. Under ‘Look in’ select “Comments”
  5. Click “Find All”

Excel will then launch a results window that helps you navigate to every cell with a comment box attached.

findcommentresults3

Clicking on a reference in this results list will navigate to the appropriate tab and cell, while (helpfully, I think) keeping this window on top.

Note that the material in the Value column reflects the visible content of the cell where the comment is attached–you will have to navigate to the cell and hover over it to see what the comment actually is. For example, in the Find results shown above, the sixth result is cell H16 on the tab called NTP or Sold, which contains the text “Fr 6B 50hz power barges”; click somewhere on that line to jump to that cell.  When you hover over it, you’ll then see the comment attached to the cell, viz., Stephanie McGinnis’s comment “left outside and water got into gauges.”

commentbox1

Of course, if an Excel file does not have any comments, you can confidently skip this routine.  How do you know if a given spreadsheet has any comment boxes lurking to begin with? Simply click on the File ribbon – the area called Prepare for Sharing will list issues with the file, including the existence of comment boxes.

DocInspector1

Under Prepare for Sharing, the first issue listed is Comments – now you know how to find and review them.  To get a more thorough analysis of the file, including a count of hidden worksheets, columns, and rows, click on Check for Issues and follow the prompts.

A disclaimer: If there are comments attached to cells in hidden worksheets, using Find All as described above will not identify them, unless and until you unhide the hidden worksheets.  (But the Prepare for Sharing box will alert you to the presence of both the hidden worksheets and the comments.)  During any kind of legal document review, you’ll want to unhide any hidden worksheets in an Excel file whether there are comments or not.

Thank you for reading.  Subscribe to the Excel Esquire blog to get more tips about using Excel in the legal environment.  And feel free to like, comment, and share!


Posted in CLE, eDiscovery, Lit Support, Native File Review | Tagged , , , , , , | 2 Comments

Avoiding Inadvertent Productions and Other Excel Blunders: New CLE via Wolters Kluwer/myLawCLE

Wolters Kluwer/myLawCLE will webcast my exciting new CLE presentation from 2-4 pm on October 16th.  I will use real Excel files to explain tricky features of Excel that attorneys must be aware of, such as hidden content, filters, comment boxes, and overflow text.   I will also discuss several high-profile episodes where failure to understand Excel led to an embarrassing lawyer moment, including the famous Lehman Brothers bankruptcy incident.  This is a unique learning opportunity for practicing lawyers–many CLE programs talk about how to cope with an inadvertent production after it’s happened, but this one will help you avoid one in the first place.

TIP_32_pixelated_final

The program will be broadcast live from Wolters Kluwer’s studio in the Google Building in NYC, and I will take emailed questions from the audience.  It should be a lively and informative event!  Follow this link to learn more and register for the webcast.

evidence-technology_book-150x211

Posted in CLE, eDiscovery, Lit Support, Native File Review, Practice Management | Tagged , , , , , | Leave a comment

Digital Detectives Podcast Interview with Excel Esquire’s Ben Kusmin – Spreadsheets as Evidence

Sharon Nelson and John Simek from the Legal Talk Network’s Digital Detectives podcast recently interviewed Excel Esquire’s Ben Kusmin about the pitfalls (and opportunities) faced by lawyers when handling their clients’ Excel spreadsheets. Among other things, we discussed native review of spreadsheets, turning them into deposition or motion exhibits, the challenges of redacting spreadsheets, and the importance of getting Excel files produced in native format. I also gave my take on the Wells Fargo inadvertent disclosure incident, and explained how Excel competence can be part of the lawyer’s duty of technology competence.  You can listen to this lively discussion by following this link to the Digital Detectives podcast. Enjoy!

TIP_82

Posted in CLE, eDiscovery, Lit Support, Native File Review, Practice Management | Tagged , , , , , , | Leave a comment