The Wells Fargo inadvertent disclosure episode provides a high-profile reminder that attorneys who are responsible for reviewing and producing client documents must thoroughly understand those documents. There were several process breakdowns that led to the inadvertent disclosure of thousands of confidential records, and not all of them were very well explained. (The affirmation of the producing attorney is available on the New York e-filing website, Index No. 652025/2017 )(see docket entry 36). But however it happened, as reported by the New York Times, the inadvertently produced material “included copious spreadsheets with customers’ names and Social Security numbers, paired with financial details like the size of their investment portfolios and the fees the bank charged them.” This might have been a pure eDiscovery mistake–i.e., an accidental production of documents due to tagging errors or miscommunication with the vendor. But I suspect some Excel ineptitude was at play as well: the producing lawyer may have affirmatively decided to produce certain spreadsheets without realizing that they contained this confidential data. Excel features such as filters and hidden columns often mean that there is data “hidden in plain sight” that escapes the attention of document reviewers.
That possibility should give us all pause–might we make the same kind of mistakes? As the producing party, the consequences of failing to review documents thoroughly go beyond just bad publicity. At one end of the spectrum you may fail to produce relevant information, and face an embarrassingly meritorious (not to mention expensive) motion to compel. At the other end, you may inadvertently produce a “treasure trove” of sensitive information that should never have been produced. Aside from potentially landing you on the pages of the New York Times, that kind of mistake may jeopardize your case, and the representation itself. If the information contains Social Security numbers or other PII, the disclosure may run afoul of state and federal privacy laws as well. Of course, as the receiving party, failing to comprehend the evidence produced by the other side means that you may be overlooking evidence that could win the case for you.
The key to avoiding such mistakes is to thoroughly understand the relevant features of Excel. This can be a challenge because the users–our clients’ employees–are very skilled users of Excel! They use it all day to create fancy spreadsheets. It’s their job. These files are not dumbed down for us when the eDiscovery vendor collects and hosts them for us to review. That means we’ve got to roll up our sleeves and get our hands dirty–whether we “like” using Excel is not relevant.
Is your document review team up to the task? Here is a list of skills that I think every reviewer must have to competently review spreadsheets in the eDiscovery context:
- Reviewing the entire workbook, not just the current tab
“In my Father’s house are many mansions . . . ” (John 14:2). So, too, are there multiple worksheets, a/k/a tabs, in a typical Excel file. Some complex accounting files can have more than 20 worksheets! Reviewers have to understand that every worksheet must be reviewed for relevant information, not just the worksheet that first pops up when you open the file. It’s not always obvious how many worksheets there are. In the example below, it looks like there are only 5 worksheets.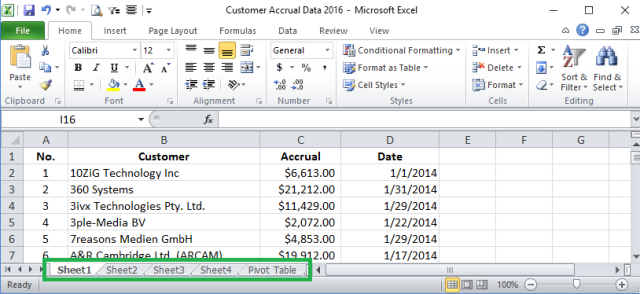
But looks can be deceiving, and they are here. You can launch a list of all the worksheets in an Excel file by right-clicking on the group of arrows in the lower left-hand corner–the area shown in green below. Doing that here reveals that there are three more worksheets, called Additional Data, Update, and Corrected Data–those sound important!

Meanwhile, to search for specific information or keywords throughout a multi-tab workbook, you can tweak Excel’s Find feature to search for content across all the worksheets, rather than only the current worksheet, which is the default. To do this, click on Options in the Find dialog box, and select “Within –> Workbook”; then choose “Find All” instead of “Find Next.”
- Understanding Filters
Filters allow a user to selectively display certain rows of a worksheet with certain characteristics. In the example below, a spreadsheet of wire payments is filtered to display only records where the customer name contains ‘Fujitsu’–there are thousands of other records in the spreadsheet that are not currently displayed, but can be revealed by clearing or turning off the filter (e.g., by the receiving party).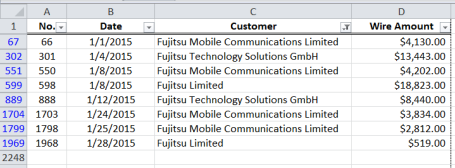
Business professionals love filters, and use them extensively. As a consequence, many native files open up with filters already applied, making a lot of the information temporarily invisible. As a document reviewer, you fail to understand filters at your peril. I discussed this issue in a recent presentation at the Harris County Law Library in Houston; the relevant (8-minute) video clip is viewable here. - Identifying hidden rows, columns, and worksheets
Relativity is not your friend here. In the default view you probably won’t recognize hidden material, much less be able to unhide it. You should really be downloading Excel files natively and reviewing within Excel to make sure you’re seeing everything. That said, your eDiscovery vendor may be able to create and populate a metadata field to flag Excel files with hidden content. Once inside, there are several tricks to find and unhide it. (I discuss one of the tricks in this post.) Remember: there is nothing necessarily nefarious about hiding content in Excel–it is usually a matter of convenience. And when the last user of the file saves it with hidden content, it will still be hidden when you open the file to review it. - Identifying & Deciphering formulas
Numbers that show up in an Excel worksheet may be just typed in, or they may be generated by a formula, a link to other cells, or both. The distinction can be extraordinarily important in a litigation. Sometimes values are hard-wired when they should be generated by a formula, and sometimes formulas and links are fudged to perpetrate a fraud. Identifying which kind of cell is which is critical. Once you identify the formulas, you’ll want to figure out how they work. You may need to call in the experts, but a basic knowledge of formula syntax can go a long way. I discuss some tips for finding and analyzing formulas, including detecting inconsistent formulas, in this post. - Understand the Freeze Panes display feature
Sometimes a worksheet is bizarrely difficult to navigate, and the reason is Freeze Panes–a way of locking the display to keep certain rows and columns visible. Some users may also have unusual Freeze Panes settings that can obscure large parts of the worksheet. These settings are easy to turn on and off from the “View” ribbon:
- Finding and Expanding Truncated Text
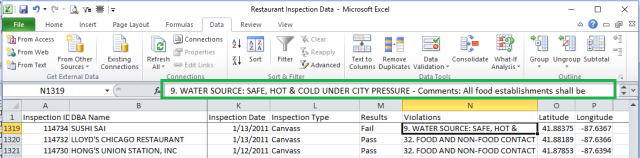
Sometimes certain cells contain reams of text that aren’t immediately visible. Take a look at the spreadsheet screen-capped below–it’s derived from publicly available data on 1,651 Chicago restaurant inspections between 2010 and 2015. (You can download this data from the Chicago Data Portal.) Column N is a field called Violations; each cell appears to have a number and then a brief description. When you click on one of those cells, you discover that there is a lot more text in it than what appears in the too-small cell. The actual contents appear (kind of) in the Formula Bar up above (shown in the green box).
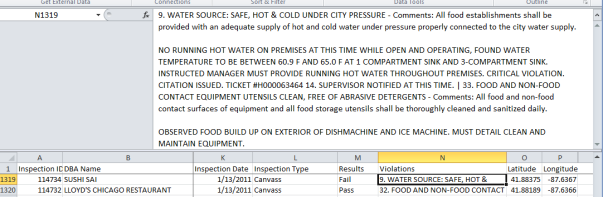
But wait, there’s more! In fact, this cell contains several paragraphs of text, and the default Formula Bar only displays the first line. When you drag the lower edge of the Formula Bar down to make it bigger, you finally see the entire Violation description.
Would your document reviewers know that they need to stretch out the Formula Bar to see all the text? Suppose your litigation involves faulty ice machines? Lead paint? Sneeze guards? How do you make sure that you’re identifying all the relevant entries in this workbook, when the relevant text may not appear initially? There are a number of Excel techniques beyond the scope of this post to plumb the depths of a text-heavy spreadsheet like this. Suffice it to say you do not want to leave the proper review of this file to chance.
- Identify the boundaries of a worksheet
You may think you are at the bottom or the edge of a set of data, but how can you be sure there isn’t more stuff down there? There are ways. For example, to jump to the very last used cell on a worksheet, hit the F5 key to launch the Go To dialog; then click Special–>Last cell.
- Finding each worksheet’s print formatting
Reviewing which data a user chose to print, and what kind of titles she added, can provide valuable insight into the case. For example, an otherwise innocuous-looking list of foreign exchange trades might have a footer that says “Fake Trades to Process”–you’d be surprised how dumb some criminals are. Fortunately, there are ways to review this information without actually printing each worksheet. One is to review the print formatting in the “Name Manager” ribbon; another is to use Print Preview.
Excel Esquire offers an interactive (and potentially CLE-accredited) workshop that illustrates the most important aspects of legal Excel review in depth, with real spreadsheets. To learn about organizing a workshop for your document review team, please get in touch with Ben Kusmin of Excel Esquire. Thanks for reading! Feel free to comment, link, or share.


A treasure trove of valuable info as usual. Thank you!
LikeLike
That is a very useful summary for novice and expert alike.
Warnings and tips at the same time.
Appreciate having been able to read it.
LikeLike
Very helpful information. Thanks for sharing.
LikeLike
Thanks for your comment Evan! Glad you found it useful.
LikeLike
Pingback: Finding and Reviewing Comment Boxes in Excel Files | Excel Esquire